|
|
||
|
OPAQUE PLANET AND RINGS TUTORIAL
|
|
THE PLANET
|
||
|
My Abbreviations of PhotoImpact commands are thus: R/c = Right click (or other click whichever you use) Commands separated with a forward slash (/) = the order of the commands or the options within a command. Hope that I havent caused any confusion but sometimes I personally find that by the time I have read the instructions in a tutorial with every command written I get lost. Sometimes quicker to read is easier to understand. :) |
||
|
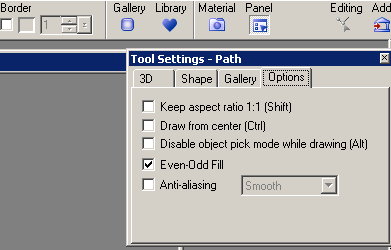
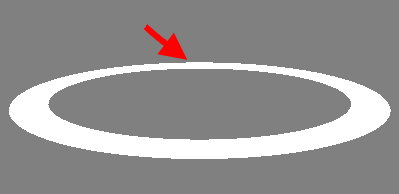
1. Open new image 600 x 600 Color 128/128/128 Change background color to 128/128/128 Foreground color to White 2. Select the Path Drawing Tool Circle/ Color White/ 2d Object. Open the Panel dialogue box and under Options uncheck Anti Aliasing. Draw a circle to nearly fill your canvas |
 |
|
|
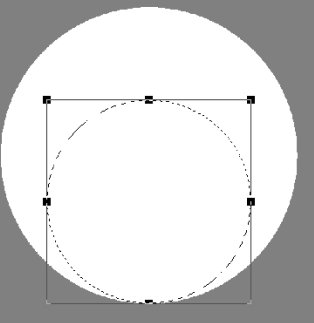
3. R/c Duplicate 4. Transform Tool / Resize Make this a little smaller than the original circle |
 |
|
|
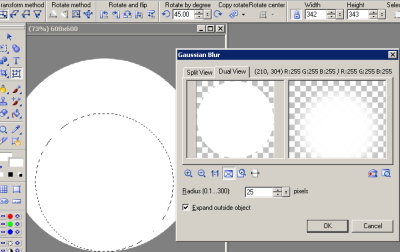
5. Photo/ Blur/ Gaussian Blur/Options/Radius 25/ Check
Expand outside Object.
|
 |
|
|
6. Edit fill/ Color/ Background color You DID change your Background color before you started didnt you? :) 7. R/c Select all Objects |
 |
|
|
8. R/c Merge All 9. Magic Wand Tool. Click on grey which is surrounding the planet |
||
|
10. R/c invert 11. R/c Convert to Object
|
||
|
13. With Planet selected and using your Pick Tool change the Soft Edge to 2-3 14. To give the Planet a little Texture you could use some Noise. Photo/Noise/Add Noise/Options But not too much about 3-4 Uniform and monochromatic |
 |
|
|
Thats The Planet finished for now
|
||
|
THE RINGS
|
|
1. Either open new canvas (same size as original) or continue on original Planet Canvas Either way have the background color 128/128/128 Choose the Path Drawing Tool/ Ellipse/ White
|
||
|
2. Draw an ellipse to cover the width of canvas The height could vary if you think it looks too tall in height just unlock the width/ height padlock and compress it down some |
 |
|
|
3. R/c/ Align/ Center both 4. R/c Duplicate/ Edit/ Fill Background Color 5. Resize a little smaller than original 6. R/c /Align/ Center Horizontally |
 |
|
| 7. Using the Up/Down/sideways Keys move this layer up nearly to the top of the original so that there is more White/Grey at the bottom of the Ellipse than at the top |
 |
|
|
8. R/c Duplicate. Edit/ Fill/ Color/ Foreground color 9. Transform Resize, again slightly smaller than the preceding ellipse |
||
|
10. R/c/ Align/ Center Horizontally 11.R/c/ Duplicate/ Edit/ Fill/ Background color |
||
|
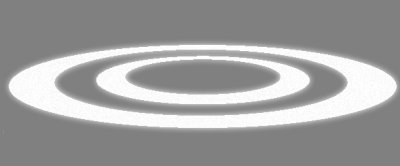
12. Resize again Make as many rings as you wish using the above method |
||
|
13. R/c Select all Objects 14. R/c Merge All 15. Magic Wand Tool. Select all grey areas (To Select the inner Grey click on the + under Mode) |
 |
|
|
16. R/c / Invert 17. R/c/ Expand/Shrink / Shrink by 2 pixels 18. R/c Convert to Object |
||
|
19. Photo/ Blur/ Gaussian Blur/ Options/ Expand Outside Object/ Radius 5 Again as with the Planet if you wish you could add noise to the rings |
 |
|
|
20. Drag Rings from their canvas onto a new one Then drag Planet onto rings canvas 21. R/c /Arrange/ Send backwards |
||
|
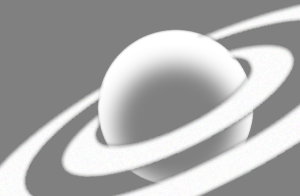
22. Resize planet to fit into rings. At this point you might want to angle the rings. To do this use your Transform Tool/Rotate Method/ Rotate Freely
|
 |
|
|
23. Use easer tool to erase parts of the rings that go behind planet 24. R/c Select All Objects 25. R/c Merge as a Single Object |
 |
|
|
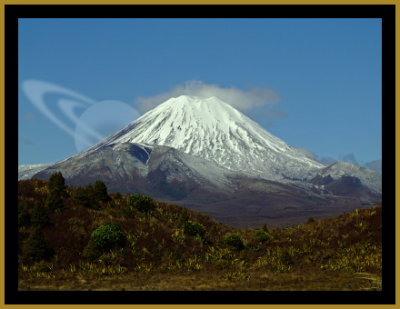
26. Drag to the image you want to put planet into and place into position 27. Change transparency so u can see what you're doing |
||
|
28. Use the Eraser Tool to carefully erase the parts
of the planet and rings that go behind anything in your image
|
 |
|
|
30. Adjust the transparency level to your own liking 31. R/c Merge All |
 |
|
|
I hope you have enjoyed this tutorial. I know I had
fun working it out
|
|
paho ©2007
|
|
(Tutorials)
|
||||