
|
|
||
|
Woven Frame
|
||
|
Level: All Version All |
||
|
Tools Used: Transform Tool/ Rotate Eraser |
||
|
Materials Needed: Image of your choice or a Tube/ Stamp |
||
|
Materials Needed: Image of your choice or a Tube/ Stamp
|
||
|
I have used Different colors to make it easier for you
to follow. You can, of course, fill or color the frame to your own taste.
I will get you to rename the layers to the colors I have used to make
it easier for you to follow. What we are basically going to do is weave
the frames together. You will be using the different shapes of the eraser
and as I don't know the correct terms for the 2 slanted erasers I will
call them \ and / .
|
|
DON'T FORGET TO SAVE OFTEN!!! There's an awful lot of work to lose |
|
My Abbreviations of PhotoImpact commands are thus: R/c = Right click (or other click whichever you use) Commands separated with a forward slash (/) = the order of the commands or the options within a command |
|
|
1. Open new White Image 2. Select Outline Drawing Tool Settings: Mode 3D Round Width5 Depth 30 3. Draw out a Square on your canvas 4. In the layer manager rename this layer RED 5. R/C Align/ Center Both |
|
|
|
6. R/C Duplicate 7. Transform Tool/ Rotate by Degree/ 30 to the Left 8. In the layer manager rename this layer GREEN 9. R/C Arrange/ Send to Back 10. Activate Red R/C Duplicate 11. Transform Tool/ Rotate by Degree/ 30 to the Right 12. In the layer manager rename this layer Purple 13. If the canvas is too small Adjust/ Expand Canvas / Expand Sides Equally checked/ Color White / Expand by 20 |
|
|
14. Select each layer one at a time and R/C Convert Object Type / Convert from Text/Path to Image 15. Select Purple layer 16. Eraser Tool/ Shape Vertical/ Size 20/ Transparency 0/ Soft Edge 0
|
||
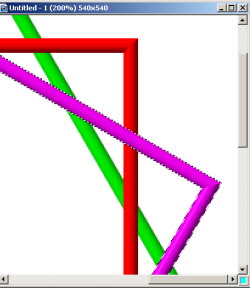
| 17. Using the + key on the numeric Keyboard zoom in so you have the top right corner of the Shapes visible (Image1) |
 |
|
|
18. Now the tricky part We will be working from the top right hand corner in an anti clockwise direction |
||
|
19. Activate the Purple line and Erase where it crosses
over the Red Line
|
||
|
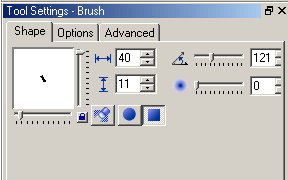
20. Change the Eraser shape to \ Shape 21. On the Attribute Bar open the Tool Settings dialogue Box. Under Shape change the settings to these (image 3). See how the angle and size changes? For the rest of this tutorial you will need to change these settings to fit the slope of the frames. I haven't included the settings as there would be too many. Just place your cursor by the angle number and use the up/down arrow keys to increase/ decrease the angle Cool huh? |
 |
|
|
22. Activate Red Layer and erase where it crosses the Green Layer 23. Using the Tool Settings you can change the size and angle of the eraser. 24. Activate purple Layer and erase where it crosses the Red Layer using Horizontal Shape Eraser 25. Using the Horizontal Scroll Bar scroll across to the center of your image 26. Activate Red Layer and Erase where it crosses Green using the / Shape Eraser and adjusting the Size and angle through the Tool Settings Panel 27. Activate Purple and erase at top Red Line and Left Side Red |
|
28. Activate Red and erase where it crosses Green 29. Activate Purple and erase where it crosses Red 30. Scroll to bottom and activate Red and erase where it crosses Green 31. Activate Purple and erase where it crosses Red 32. Activate Red and erase where it crosses Green 33. Activate Purple and erase over Red 34. Activate Red and erase over Green 35. Activate Purple and Erase over Red |
||
|
36. PHEW!!!!
|
||
|
37. R/C Select All Objects 38. R/C Merge as a Single Object 39. R/C Deselect all Objects 40. R/C All 41. R/C Convert to Object 42. Magic Wand Click on white area around the Frame 43. R/C Invert 44. Delete 45. View/ Show Base Image 46. Space Bar to Deselect Selection |
||
|
47. Edit/ Fill. Choose your own fill here 48. Activate the Frame R/C Shadow 5th Icon settings 30/ 100/ 5 49. Add an Image/ Tube or Stamp of your Choice 50. R/C Select All Objects 51. R/C Merge as a Single Object 52. Web/ Image Optimizer/ Save as .gif 53. Or Just add a background and save as a .jpg |
||
|
I hope you enjoyed this tutorial and that you have learned
some more of the tools available in PI. Any questions please don't hesitate
to contact me through email at the bottom of this page. Also please sign
my guestbook. It would be nice to know where you are from and what you
think of this tutorial and my other tuts as well. Check out my PI
Hints and Tips too. Some of them are real handy.
|
|
paho 2009
|
|
(Tutorials)
|
||||