|
|
|
Textured Blend
|
||
|
Learn how to add texture to a part of an image with this tutorial and how to create your own Gradient. This tutorial is in 4 Parts. At the end of this tutorial I shall explain why I have done some of the things I have done. I will mark the explanations with an * and the part and line number.
My Abbreviations of PhotoImpact commands are thus: R/c = Right click (or other click whichever you use) Commands separated with a forward slash (/) = the order of the commands or the options within a command |
|
PI Version 10 but can be done in other versions. Level Intermediate |
||
|
Materials needed: Images or Tubes of your choice Blending Mask. Wouter has a Tutorial for making your own here FM Tile Tool. If you wish to use the images I have used you may get them here. |
Tools we will be using: Texture Filter Magic Gradient Pallet Ramp Editor HighLight Midtone Shadow |
|
PART ONE THE TUBE |
||
|
First we will start by preparing our Tube
|
||
|
|
1. Open Seascape_01.jpg Ctrl + D to duplicate it and close the original 2. R/C Copy 3. Effect/ All/ Texture Filter. Select the 2nd preview which is Embossed. Settings are, from top to bottom, 100/ 20/ 50/ 0 / 45. Click on Still. Then on OK. |
|
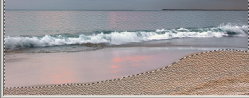
6. * Carefully erase the part where you want to have the texture showing. I am erasing the sand and the sea. For the Sand I used No Transparency and no soft edge but for the sea I have used a size 67 eraser to start with and made it smaller as I crossed the image. I used a transparency of 75 and a soft edge of 6. I also changed the shape to Square so I could line up the horizon more easily. 7. When erasing the sea move your eraser a square at a time. DON'T go back over it as that will result in having a stronger texture showing through in that spot and it will look uneven. 8. Once you are happy with the erasing R/C Merge All |
 |
|
9. Magic Wand Tool. Settings, Left to right in the Attributes Bar are: Area checked/ 32/ Search Connected pixels Checked. 10. Click on the white part of the surf to select it. TIP!!! If the sea and/or sky become selected just hit the undo button. 11. Effects/ FM Tile Tool/ Blend Emboss. Default settings but change Intensity to 1.000 |
 |
||
| 12. At this step you can also choose to use Photo/Sharpen on the surf.
I have chosen not to.
13. *I also used Blend emboss on the top layer but with a low Intensity of .105 14. R/C Merge All. |
| 15. Open The Easy Pallet and find the Mask you made earlier.
16. Double click on it to apply it 17. Transform Tool/ Resize/ Keep Aspect Ratio Unlocked/ Selection Checked 18. Maximize the canvas for this next step. 19. Resize the Selection so it forms an oval. You need to position it so that there is some sky and sand in the oval. Restore Back to normal canvas size 20. R/C Convert to Object 21. R/C Copy |
|
|
|
22. Save this now as a .UFO You can now close this as we have finished with it. |
|
|
We have now prepared our tube. PART TWO THE GRADIENT
|
|
1. Click on your foreground color box in the Tool Panel and enter #F89C73 in the Hex Box 2. Click on the Background box and enter #BD6347 in the Hex Box |
||
|
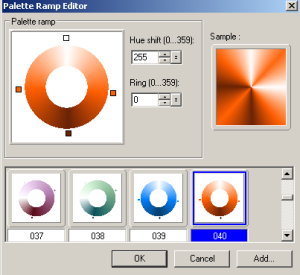
3. Open a new image white. Size doesn't matter but we need to be able to access Edit/Fill. 4. Click on Edit/ Fill. Gradient Tab. Check Magic Gradient and click on the Magic Gradient color swatch that will take you to the Pallet Ramp Editor click on Edit and then scroll to 040
|
 |
|
|
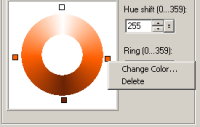
5. Left click on one of the small boxes beside the ring and then click on change color. |
|
|
|
6. Copy this number #F89C73 and paste into the color picker Hex Space. OK 7. Click on the opposite box on the ring and paste this number into the color picker hex space #BD6347. OK |
||
| 8. Move the small boxes to about where I have them. |
 |
|
9. If you like this Gradient you can add it to your pallet by clicking on Add at the bottom of the Pallet Ramp Editor. Once done click OK. 10. Now you are back in the Magic Gradient section. |
|
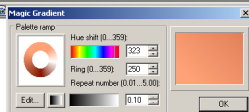
11. * Click on Mode 1 and
use these settings. OK
|
 |
|
|
That is our gradient done
PART THREE Let's put it all together |
|
1. Open New Image 400 x 400 transparent 2. Paste. Move to bottom of Canvas |
||
|
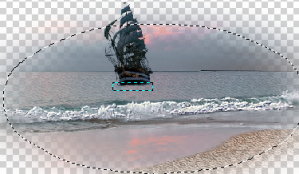
3. Open Sailboat_010 4. Adjust Resize/ Selected Image 25% 5. Copy and paste onto Tube 6. *Adjust Highlight Midtone Shadow. Settings: Master/ -40/ -16/ -2 OK. 7. Deselect |
| 8. Activate the tube(Not the Ship) and using the Standard Selection Tool set at rectangle make a small rectangle along the bottom of the ship |
 |
|
| 9. Copy and paste. It will paste back from whence it came but it will be OVER the bottom of the ship. I do this so the ship doesn't look like it is sitting on top of the water. | TIP!!! if you want to see if it is indeed as I say and you move it just use the undo function OR alt + Backspace to replace it. |
|
10. Open Gull_01.UfO. Resize it to 50%. Selected Object Checked. 11. Copy then paste into Tube canvas. Move it to the right hand side of the tube and towards the shoreline |
||
|
12. Open Gull_02.UFO. Resize to 15% 34. Copy then paste into tube canvas. 13. *Duplicate this gull and using the transform tool flip it horizontally. 14. Move these 2 gulls to the left side of the tube. |
|
14. *Select one of the left hand gulls and using Adjust Highlight Midtone Shadow with the same settings as before which were: Master/ -40/ -16/ -2 OK. 15. *Repeat with the other left hand Gull. |
||
|
16. View/ Show Base Image 17. Edit Fill / Gradient/ Magic Gradient/ Edit/ the gradient you just made. 18. OK. OK. OK. 19. R/C Merge All |
|
Now the Frame. PART FOUR THE FRAME |
|
1. R/C All 2. R/C Border. 2 Pixels Wide. Inward/ Circle/ Anti-Alias Checked. OK 3. Edit Fill. Color/ Black |
|
4. Adjust Expand Canvas. White 5 pixels. Expand sides equally/ Checked. OK. 5. Magic Wand/ click in white area. |
| 6. Edit/ Fill/ Gradient/ Magic gradient/ Edit/ your gradient with these settings. |
 |
| 7. While still Selected go to Attribute Bar/ Web/ Button Designer/ Any Shape. Bevel Tab with these settings |
 |
| 8. R/C Shadow with settings from top to bottom: 1st shadow/ 3/ 3/ 25/ 100/ 5 |
|
9. R/C Merge All. 10. Adjust Expand Canvas/ 2/ Black 11. Adjust Expand Canvas/ 15 /White 12. Magic Wand select white area 13. Edit/ Fill again with your gradient but change the settings again by changing to Mode 7 14. Adjust/ Expand Canvas/ 2/ Black |
|
15. Add any text you would like to and your watermark. 16.* Resize if needs be and go to Photo/Sharpen at 1st option |
|
Why We Did What We Did
|
|
*6 & 13 PART ONE The reason I used no Transparency on the sand was that in reality the sand would be much closer to the viewer than the sea. So therefore more texture would be obvious in the sand the sea is further away so texture slightly less obvious. The same logic was applied to the sky
|
|
*11 PART TWO When wanting to adjust the settings in the magic gradient area some of the modes don't allow for the changes, so select one that does then you can change to the actual mode you want
|
|
*6, 14 &15 PART THREE I used the highlight Midtone shadow on the sail boat as it was out to sea, so therefore of course the details would be kinda blurred and dark. The same goes for the birds except the reason is that they are up high in the sky. Notice we didn't touch the gull in the foreground because it is much closer to the viewer.
|
| *13 PART THREE Why did I duplicate the gull and flip it? So that even though they were the same bird they look a little different. |
| *16 PART FOUR. I sharpened my image after resizing as in the resizing process images lose some definition. This is an excellant habit to get into. |
|
I hope you enjoyed this tutorial and that you maybe
have learned something helpful for your journey through PI.
|
|
paho 2009
|
|
(Tutorials)
|
||||