|
|
||
|
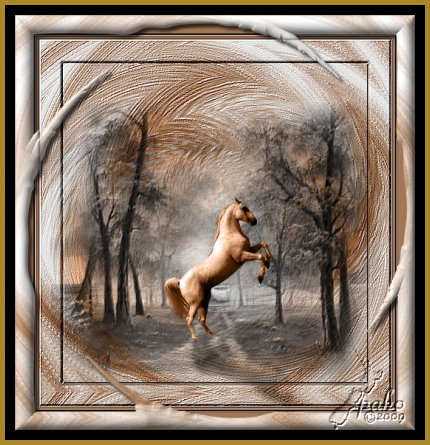
Reaching for Freedom
|
||
|
This is my own Tutorial and any similarity to any other tutorial is coincidental. Please read my Terms of Use |
|
Version: PI 10 but can be done in other Versions Level: All |
|
Materials Needed: 2 Tubes of your Choice FMTile Tools Blend Emboss (FMTile Tools is a Demo but Blend Emboss will keep working. BorderMania Filter Factory Gallery B My Tubes Here |
||
|
My Abbreviations of PhotoImpact commands are thus: R/c = Right click (or other click whichever you use) Commands separated with a forward slash (/) = the order of the commands or the options within a command |
|
1. Open New File 478 x 498 2. Edit/Fill/ Texture/ Magic Texture/ MT90 3. Effect/ Distort/ Ripple/ Options/ Edge/ High/ 570 4. Photo/ Blur/ Gaussian Blur/ 1st Blur 5. Effects/ FU/ Filter Factory/ Gallery B/ Seismic Twirl/ 40/ 94/ 255 |
|
6. Save as .jpg as we will need this later. 7. Effects/ BorderMania/ Frame#2/ Settings/ 7/ 28/ 110/ 149 8. Selection/ All 9. Selection/ Expand Shrink/ Shrink/ 33 10. R/C Convert to Object 11. R/C Shadow/ Default Icon/ Settings/ 1/ 2/ 20/ 101/ 4 |
|
12. Effects/ BorderMania/ Frame #2/ 0/ 0/ 3/ 149 13. R/C Merge 14. Effects/ FMTile Tools/ Blend Emboss 15. Open Tube / Copy and Paste it onto the BG you just made 16. R/C Properties/ Blend Mode/ Luminosity Only 17. Using the Transform Tool set to Resize drag the tube to make it larger so that it fits into the inner BG ( See Image above) |
|
18. Using Pick Tool move it to just above the lower edge of the inner Object 19. R/C Align/ Center horizontally 20. Effects/ FMTile Tools/ Blend Emboss 21. R/C Merge 22. Adjust/ Expand Canvas/ 4/ white/ Expand sides Equally 23. Magic wand/ Select White border 24. Edit Fill/ Color/ choose color from your image 25. Effects/ BorderMania/ frame #2/ settings/ 4/ 4/ 110/130
|
|
26. Adjust/ Expand Canvas/ 25 White / Expand sides Equally 27. Magic Wand /Select White Border 28. Edit/Fill/ Color/ Same color as Step 20 29. R/C Convert to Object and drag to off the canvas to its own White Canvas 30. R/C Merge All
|
|
31. Effects/Distort/ Whirlpool/ Options/ Direction Clockwise/ Twist Degrees 720 32. Edit/Repeat Whirlpool/ same settings as above. Repeat this step about 5 times 33. Magic wand tool / Select by Line/ Similarity 0/ Search Connected Pixels. Select the middle of the canvas (white) 34. R/C Invert 35. Edit/ Trace Edges/ Selection Marquee/ Accept defaults 36. Change the Mode to 3D round. TIP!!!! You can change the Bevel settings to suit yourself by opening the Material Box from the attribute Bar 37. Edit/Fill/ Image/ File/ Browse to the BG you saved at the beginning/ Fit the Image
|
|
38. R/C Copy 39. Back to your Image and R/C Paste 40. R/C Shadow / 1st Icon/ 5/ 5/ 30/ 100/ 5 41. Merge All |
|
42. Open Horse.Ufo. R/C Copy 43. R/C Paste into your working canvas 44. Adjust/ Resize/ 30% 45. Position Horse in road where you want him TIP!!!! If you set him at the back of the road don't forget to resize him even smaller. You need Perspective. 46. At this stage I also used my colorize pen and recolored the horse using a dark color from my BG 47. R/C Shadow/6th Icon/ Default Settings 48. R/C Split Shadow 49. Click on the shadow to activate it 50. Transform Tool/ Flip Vertically 51. Adjust Resize/ 75% 52. Transform Tool /Rotate by Degree/ 10 left 53. Line up the hind hooves of the shadow with the horses hind hooves 54. While the Shadow is still active 55. Edit/ Fade out/ White 100%/ Black 50% 56. Direction Horizontal ( 2nd Icon) 57. R/C merge All 58. Add your watermark. |
|
I hope you enjoyed this tutorial and that you have learned
some more of the tools available in PI. Any questions please don't hesitate
to contact me through email at the bottom of this page. Also please sign
my guestbook. It would be nice to know where you are from and what you
think of this tutorial and my other tuts as well. Check out my PI
Hints and Tips too. Some of them are real handy.
|
|
paho 2009
|
|
(Tutorials)
|
||||