|
|
||
|
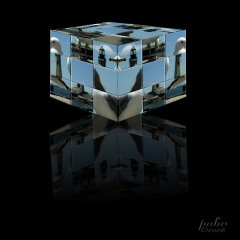
Picture Puzzle Cube Tutorial
|
|
This Tutorial will show you how to make a photo into
a puzzle type cube. It is not animated. I have also included a small tutorial
on making a reflection of the cube
|
||
|
This was done in PI10 Experience: Beginners Time needed: About 1-2 hours |
|
Materials Needed: Photo of your choice. A Square photo is best Tools and Effects: Button designer/ Any Shape Transform Tool/Slant and Distort/ Rotate Freely Fade out Transparency |
|
My Abbreviations of PhotoImpact commands are thus: R/c
= Right click (or other click whichever you use)
|
|
Commands separated with a forward slash (/)
= the order of the commands or the options within a command.
|
|
1. Decide on the photo you want to use. Open it, Duplicate it and resize if necessary. If you do resize it you will need to save it. Close it.
|
||
|
2. Open a new canvas the same size as your photo.
|
||
|
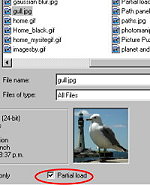
3. File/ Open. Browse to the photo. Click once on it to highlight it. At the bottom of this box check Partial Load. Click OK
|
 |
|
|
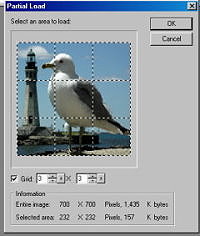
4. The box that opens gives you the option of which part of the photo you wish to open. However we don't want just one part at this stage. We need to tell it how many segments we want. I have chosen 3x3. Click OK.
|
 |
|
| The first segment has opened in the workplace. |
|
|
|
5. R/C /Copy. Click on your blank canvas to activate it then R/C Paste.
|
||
|
6. Close the first segment of your photo.
|
||
|
7. File/Open and click again on the photo you are using. Click on open. Click on the Second Grid. Click OK.
|
||
|
8. Repeat Steps 5 through to 7 moving along each segment each time until you have opened each segment. It doesn't matter for now if you want to rearrange the segments or just let them pile up in the corner of your canvas.
|
Tip!! You must close the open
segment each time before opening the next segment.
|
|
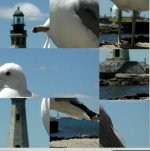
9. Once you have opened all the segments you can now arrange them randomly on your canvas. Remember how many grids you had and lay out your segments to the same size. Since I chose 3x3 pieces so i set out my segments as 3x3
|
 |
|
|
10. To line them up evenly use your R/C /Align command. To move the segments a few pixels at a time use your keyboard arrow keys. Once you have a row aligned to your satisfaction R/C /Group so you don't inadvertently move it.
|
Tip!! If you get completely frustrated
do a slight crop around the edges once you have finished
|
|
|
11. Once you are satisfied R/C /Ungroup any groups you have made. Activate the first of your segments.
|
||
|
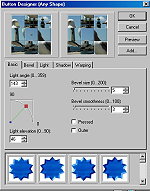
12. Now go to Web/Button Designer/Any Shape. Choose a button bevel that you think looks good on your photo. Don't be afraid to play with Bevel Size or Smoothness either. Click OK.
|
 |
|
|
Tip!! You will notice that the button designer will possibly darken your photo. To overcome this adjust the Light elevation to bring it back to the original lightness.
|
||
| 13. Repeat the last step for each of your segments. |
Tip!! Once you have set up the
button designer it will stay the same until you close PI. So it will be
just a case of opening Button Designer/Any Shape and clicking OK for each
segment.
|
|
|
Now we have our photo ready to become a cube.
|
||
|
14. Activate one of the segments. R/C/ Select all Objects. R/C /Merge as a Single Object.
|
||
|
15. Depending on the size of your photo you may now need to resize it. Go to Adjust/Resize. In the Resize dialogue Box make sure that in the Apply To Section there is a check next to the Image and Object(s) before resizing. Make it about 200 pixels wide.
|
||
|
16. File/Open/New Image. Color White for now. Size 600x600. The size is of course your choice but I like lots of room to play around in.
|
|
17. R/C /Copy your now tiled puzzle photo
|
||
|
18. Activate your new canvas and R/C Paste.
|
||
|
19. Change to your Transform Tool and in the Attribute Bar under Transform Method click on the Slant Icon. Drag the top left corner upwards. We shall call this Side 1.
|
|
|
|
20. R/C Duplicate your Image twice and drag one copy (We will call this the TOP) off to its own canvas for now.
|
||
| 21. Still using the Transform Tool in the Attributes Bar click in the Rotate and Flip Section click on Flip Horizontally. |

|
|
|
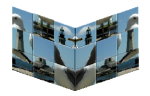
22. Using the arrow keys on your Keyboard move this layer (Side 2) over to line up with the first layer in the middle. This will give you a V Shaped shape. Make sure that it lines up and that there is no space between the 2 sides.
|
 |
|
|
23. While the 2nd side is still active R/C Select All Objects. R/C Group.
|
||
|
24. Drag the original duplication (TOP) back into the main canvas.
|
||
|
25. Select your Transform Tool again and select the Distort button from the Attributes Bar.
|
||
|
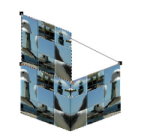
26. Line the TOP layer up with the left side of Side1. Drag the top right corner to the right side top. Then drag the remaining corner across and down towards the center so that it nearly flat but not quite.
|
|
 |
|
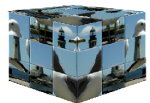
Now we shall add a reflection of the cube to our canvas
|
|
28. R/C All
|
||
|
29. Edit/Fill Black (Or your own Color of course). Hit the Space bar to Deselect.
|
||
|
30. Using your pick tool move the cube to the top of your canvas
|
||
|
31. R/C on your Cube /Duplicate
|
||
|
32. Transform Tool/Rotate and Flip /Flip Vertically.
|
||
|
33. Using Arrow Keys move the inverted cube to below the original cube
|
||
|
34.Go back to your Pick Tool In the Attribute Bar change the Transparency to about 65
|
||
|
35. Edit/Fade out. Click OK
|
||
|
36. Transform Tool/ Rotate Method/ Rotate Freely. Play with the rotation of your Reflection to get it how you think it looks good. Remember too, that depending on how you angle the Reflection you may need to R/C/ Arrange/ Send Backwards so that the reflection isn't on top of your cube
|
||
|
36. R/C Merge All
|
|
37. Add your Watermark.
|
|
I hope you enjoyed this tutorial and that it gave you some insight into the Transform Tool.
|
| paho ©2008 |
|
(Tutorials)
|
||||
