|
|
|
|
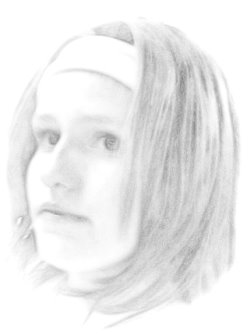
From This
|
To This
|
||
|
Photo to Drawing Tutorial
|
||
|
I know there are a lot of photo to drawing tutorials
for PI and this is another one that gives a soft pencil drawing look to
a photo.
|
|
This was done in PI10.
|
||
|
Rating: Beginners
|
||
| What you need is a photo of your choice |
|
A blending mask. If you don't have one Wouter has a
good easy Tutorial Here
|
|
and the inbuilt tools of PI.
|
|
Make sure that your background color is set to White.
|
|
1. Open your image and duplicate it. Close the original. TIP!!This is one of the most important habits to get into so that you never lose your original files! |
|
2. Open the Quick Command Panel and using the drop down menu select Color Sketch. 3. Click on the blue arrow to start the task |
|
4. Click on undo 3 times (I know :) but it beat trying
to figure out settings! )
|
|
5. Photo/ Enhance/ Monochrome/ OK
|
|
6. Photo/ Enhance/ Diffuse Glow with these settings: Threshold 20 Degree of Glow 5 Graininess 2 . Glow color custom color/ White. OK These are the settings I used but it could depend on the depth of color that you have in your own photo so you might have to experiment with the settings. |
|
7. Go to the Quick Color Control Panel and click on the + sign for brightness once 8. Go to the Quick Color Control Panel and click on the - sign for contrast twice. |
TIP!! This is at the bottom of
your Tool Bar. If it is not there go to File/ Preferences/ General/ Tools
and check the box that says Show Quick Color Control Panel.
|
|
9. Open your Easy Pallet then the Object library which will be where your blending mask is. 10. Double click on the Blending Mask which will place the mask on your image. |
|
11. Resize the mask if necessary. To do this click on
your transform tool choose Resize then go across the Attribute Bar to
Selection and click on that.
|
|
TIP!! If you don't click on Selection
your whole image will resize. Because you are using a blending mask with
a large Soft Edge you can afford to keep the mask close to your image.
If the image you are using is close to an edge of your canvas go to Adjust/
Expand canvas and expand the Side/ Top/ or Bottom that you need the extra
space on. Don't worry about the color
leave or make it white as this
particular image will be going on a white background.
|
 |
|
12. Once you are happy with the placement and size of the mask R/C Convert to Object 13. Drag the Object to a new White canvas. |
|
14. The image I am using is not straight on my canvas
so I will use my Transform Tool to straighten it. Transform Tool/ Rotate
Freely
|
|
Tip!! Because of the size of the
Mask I used I have lost the corners of my resize box. To find them click
on the maximize button on your image.
|
 |
|
15. Using your Object Paint Eraser tool with these settings
erase around the edge of your image to eliminate any background.
|
|
Transparency 70 Soft Edge 65 |
|
16. When you are happy with the erasing R/C Merge All.
|
|
17. Go Back to the Quick Tuning Panel and give your
drawing a tweak with the brightness and contrast buttons.
|
|
I hope you enjoyed this Tutorial
|
|
©paho 2008
|
|
(Tutorials)
|
||||