UpRight Vertical Text
|
Playing with Text
|
|
|
UpRight Vertical Text
|
|
|
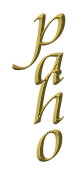
I am not a great user of text but I recently wanted to use it and in particular I wanted to use Vertical text that was a true vertical. I searched high and low for a tutorial to tell me how to do it and couldn't find one so decided the only way to go was to 'play' and find out for myself. Below is my result. :) PhotoImpact does have Vertical text in its EP but the text is sideways and its bad enough having to look sideways at smiley faces without having to look sideways to see what is written! I hope to have the enthusiasm to 'play' some more with text and if I come up with something worthwhile I shall write another Tut to carry on from this one. |
|
Level: Beginner PI Version 10 but could be done in other Versions Materials Needed: Font of Choice and Imagination |
||
|
My Commands are as follows: R/C = Right Click / = follow on commands |
|
1. Open new image 2. Select text tool/font/colour and size ..font colour and size can all be changed later if you don't like what you have chosen
|
||
|
3. Click on your canvas 4. If the text tool panel doesn't open automatically from the Attribute Bar click on the Panel Button to open it
|
||
|
5. Under style you may notice that everything is grayed out so click on your canvas again to activate it
|
||
|
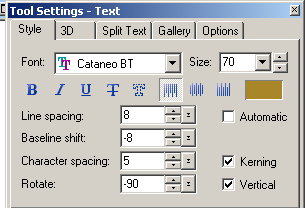
6. Still on the style tab uncheck Automatic 7. Adjust the line spacing to 8 8. Baseline shift to -8 9. Check kerning box and change character spacing to 5 10. Rotate to -90 11. Check Vertical Box
|
 |
|
|
12. Type your Text 13. Now you have vertical Text : in it's right format |
|
|
|
14. If you are happy with what you have you can now
R/C Merge it.
|
||
|
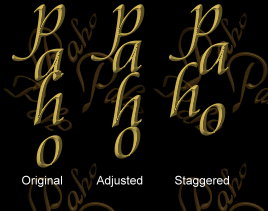
15. I am not happy with mine as the 'h' is way too far away from the 'o' and too close to the 'a' so 16. Click on your Pick tool then back to your Text tool 17. From the Panel click on the Split Text Tab 18. Click on Split |
||
|
19. Back to your Pick tool again 20. Either Right Click/Deselect all Objects or just click on your canvas but NOT on your text 21. Now all I need to do is to activate my 'h' by clicking on it and using my down Arrow key move the 'h' down closer to the 'o' and I moved the 'p' a little as well and now I am happy :)
|
 |
|
|
If you wanted to stagger the letters you can do the
same thing
Select the letter and using you arrow keys move them to where/how
you want them.
|
|
To move them all just hold Shift and click on each
letter to select them all and they can now be moved as one or you can
group them.
|
|
Now that you have the letters where/how you want them
you can now change the color/ font
.Be careful tho about which font
you change to or you will have to go back to the drawing board to get
the kerning correct again.
|
|
Add material to them from the Easy Pallett. To do
this make sure they are selected and just double click whichever Effect
you want to apply it
. Or fill it with a gradient or image even.
|
|
Important!!!
|
|
Change all the panel settings back to 0 or next time you use the Tool it will still be on same settings.
|
 |
|
I hope this Tutorial was helpful to you and that you
enjoyed it
|
|
|
|
(Tutorials)
|
||||