 |
||
|
During my journey through learning PhotoImpact I have found out, what I consider to be, some interesting and helpful tips and tricks. Some of those things are not actually documented anywhere within PI, nor have I found them in other Tutorials and, if by chance they have been, I am only sharing with you and not claiming any rights. Most of these hints and tips I am sharing I have found out quite by accident. Keep checking back as hopefully I will find more hints and tips for PI. |
|
|
|
Did You Know that if by mistake you open a new canvas
with a colored BG when you wanted a Transparent Canvas that instead
of closing it and starting over that you can just go to View/ Show Base
Image?
|
|
|
|
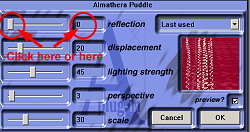
Did You Know that with Some
FILTERS/ PLUGINS you can use the arrow keys on your keyboard
to get precise settings? Just click on either the slider or by the numbers
then tap away on the arrow keys. This also applies to many of the Adjust/
Effect menus that are built into PI. So try it on any popup window that
has Sliders.
|
 |
|
|
|
UNDO : Did You Know that
another KeyBoard Shortcut for undo is to Hold Alt and tap Backspace
till you get to where you want to be? However If you need to go wayyyyy
back then Edit/Undo is still the quickest way to go.
|
|
|
| SHADOWS: Did You Know that you can create shadows on shadows? Simply Split your shadow, stay on the object or the shadow and create another Shadow...perhaps in a different colour. |
|
TOOL PANEL: Did You Know that by pressing the ~ key you will get a mini Floating Tool Panel right under your mouse? |
|
ZOOM IN: Did You Know..that to make your canvas Larger instead of using the Zoom Tool you can use the + Key on your numeric pad OR hold Shift while tapping the + on your main keyboard? |
|
ZOOM OUT: Did You Know that to Zoom Out you can use the - key on your numeric keypad or the - on your Keyboard? |
|
MERGE MODES: Other programs have different names for their mege modes. Here are some of the differences. PI names are first followed by the "Others Names" |
|
Inverse of Multiply= Screen
|
Lighten= Colour Dodge
|
Darken=Colour Burn
|
|
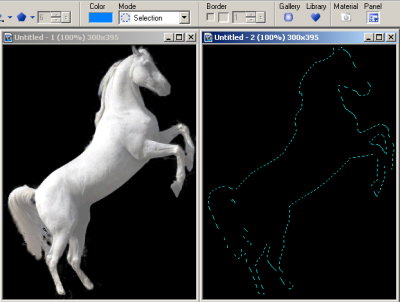
SELECTIONS: I have dicovered a couple of tips for Selections. To do them you will need to use the following tip first. This tip is my latest find : Did You Know when you are doing a Paintshop Pro tutorial and it states Selection/All...Selection Invert that PSP will set the Selection around an Object and that this move can be replicated in PI? Suppose you have an object on your canvas and it is selected ... in PI that object will have marching ants around it... we dont want those ants...we just want the selection marquee. To get that Selection go to Edit/ Trace Edges/Selection Marquee. Then change the Mode to Selection...Easy huh?? And I didnt even have to go through the motion of going to the Path Drawing Tool First!! Then just hide or delete your object if you dont need/want it anymore. Make sure though that before you go on with your tutorial that in the Layer Manager you are on the correct Layer. |
 |
|
Now suppose that you want to make an edge around that Selection to go under the object. The most common way I have seen is to use Paint on Edges. However I don't really like the way that looks so what I do is to duplicate my layer, then do the above steps and then go to Selection/Expand/Shrink and expand my Selection by however many pixels I want, then go back to Selection/Soften and I can enter a SoftEdge Value there and then fill that selection with my Color/Texture....Again...make sure you are on the correct Layer....or I could just use a shadow of course. |
|
Did You know that you can also use Seletion to Burn/Dodge the edges of an object neatly? Just do the above bit to get the selection you need then Shrink the selection by the Value you need. Convert your object to an Image and burn/dodge the outline where you want it.You will need to play with the SoftEdge Setting. I discovered this tip, as when I try to do Dodge/Burn my hand is too shakey using just the mouse.Could also be used for any of the other tools when you want a small edge added. |
|
|
| Did You Know that Selections can be also be used through several layers. Just select each layer you want the selection on and do whatever you want to do with the selection. |
|
|
|
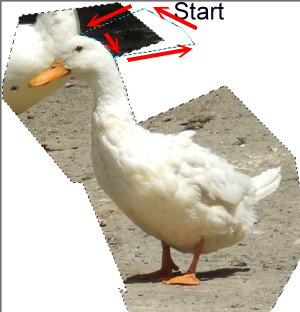
TUBES: I
find cutting out part of an image kinda hard and tedious and I find
the PI Extract Object Tool rather clumsy in the Cleanup section so the
way I do it is to use the Lasso Tool. First I make a very rough Selection
around the image I want to use. Convert to an Object and drag it to
a new canvas. Then I use the Lasso Tool to make Selections around my
image and hit delete. I work from outside the original BG to the part
I want to keep... I also use a SoftEdge of about 3. If I have missed
any bits I just go back over them again. When I am happy with my results
I might soften the edges by another 1 pixel. Another hint here... Do
you find that when you hit delete nothing happens? Check that you are
on the correct layer.
|
 |
|
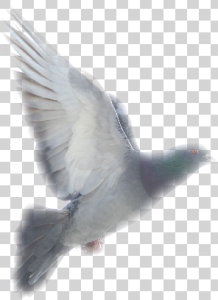
Now that I have got the extraction part over I might
decide to Mist the image. To do this I drag my image to a new canvas
and I usually have a dark BackGround....do the above selection
part to get a selection around my image.Selection/Expand/Shrink. Expand
by about 3 uncheck Keep original Softedge. Selection/Soften by around
25. Selection/Invert. Make sure I am on the top layer and hit delete
3-6 times depending on how misted I want my image to be. View Base Image
and save as a UFO.
|
|
oh!! look... LOL my duck turned into a dove!! but
dont worry that happened coz I was too lazy to finish extracting the
duck!
|
 |
|
|
|
|
Did You Know that the Creative
Transform Filter is the same filter as other programs Liquify
Filter? Just a tad harder to use though as it has no grid lines
|
|
|
|
Did You Know that when you download some materials for a PSP Tutorial and the image is blank you can just hit Ctrl/D to duplicate it and the images will appear. If they dont just check your Layer Manager and click on the eye to make the content visible.
|
|
Did You Know that if you have a gold fill that doesnt
quite fit your needs that by using the Highlight
Midtone Shadow feature you can alter the lighting of it? Thank
You HILDIE for that Tip. It works wonderfully.
|
|
|
|
(Tutorials)
|
||||