
|
|
||
|
Lets Make our Own Gradient
|
||
|
Level: All Versions: All |
||
|
Sometimes we want to use a gradient but we don't like
any of the ones that PI supplies for us. So, how do we go about making
our own and saving them?? It is easy. You can use as many colors as desired
using this method. For the purpose of this tutorial we will just use 3.
The only problem with making your own gradients is that we cant use the
Right Click to choose our colors. So we need to choose the colors we want
before we begin and jot down the hex numbers.
|
|
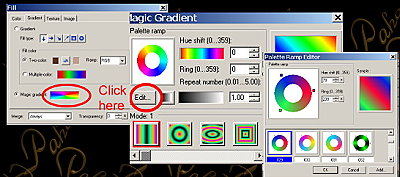
1.Open PI and Open a new Blank Canvas. Any size will do 2. Edit/Fill and click on the Gradient tab 3. To make our own Gradients we have to use Magic Gradients as the Two Color and Multiple Color do not allow for saving. So click on the Magic Gradient color block as shown. This will open Magic Gradient Color Ramp. 4. Click on Edit under the Color Wheel. Now we have the Color Ramp Editor open. Scroll down to 029. I am using this wheel as it already has 3 colors. Notice the small squares around the Wheel. These are where we change the color or delete a color. |
 |
|
|
5. R/C on one of the squares and select Change Color. The Color Picker will open so just type in the Hex number of one of the colors you chose. OK 6. R/C on the next square and repeat with your second color. 7. And finally on the last square and repeat again. |
||
|
You have now changed the colors. At this stage you can now if you wish change the position of the shades by using the Ring Slider. You can also change the color by using the Hue Slider. Before leaving this Dialogue you can now save this Gradient by clicking on ADD. This will save the Gradient you have just made in the Pallet Ramp. You can also rename it if you wish by R/C and selecting Rename. Once you have finished here click on OK. This will take you back to the Magic Gradient Box. |
||
|
9. Now for some Fun stuff. This is where you can now further edit your Gradient. It won't save so if you like what you have done you will need to jot down the settings you used. For this step you will play with the settings to get your gradient how you want it. 10. By clicking on the small gradient box by the Edit button you can adjust how your gradient looks. 11. Set the Mode to 1 for this exercise. But again the mode is up to you and what you want from your gradient. |
||
 |
||
|
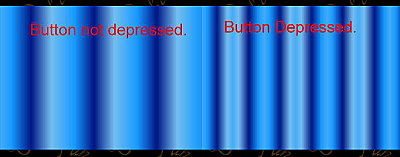
12. Click on the little gradient box so it is depressed. Play with this button to see the effect it has on the Gradient. To the right is where you can change the direction of the light on your gradient. By using the up/down options on this you can change the look of your gradient. Again play with the numbers. |
|
13. At the bottom of the Magic Gradient box is the slope dial. This changes the direction of the gradient. Play !! 14. Once you have the gradient to your satisfaction click on OK then OK again and it will fill as per usual. 15. I like to apply Gaussian Blur at a ratio of 30 to most of my gradients if I want a softer background but again that is up to you. |
|
I hope you have enjoyed this tutorial and that you can
have some fun making your own Gradients.
|
|
paho
|
||
|
©2009
|
|
(Tutorials)
|
||||