
DIFFERENT WORLDS TUTORIAL
|
|
||
|
||
|
1. Open the image you wish to use and duplicate it (ctrl+d) Close or minimize your original image you will need it later. 2. Select your Path Drawing tool Mode 2D Object Color doesn't matter at this stage. 3. Draw a 300x300 circle anywhere on your image or size to suit your image 4. Click on the Material icon in the Attributes bar |
|||
|
|
|||
|
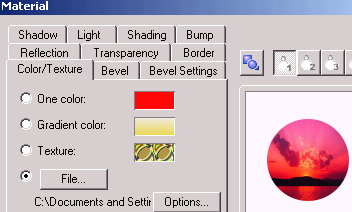
In the dialogue box that opens select the color/texture tab Check next to the file button and browse to your original image Select this image and click on open or double click it |
 |
||
|
5. Change the Path Mode
to 3D Round.
|
|||
|
6. Again open the Material Dialogue Box. Click on the Bump Tab. Check the Bump Map box Browse to your original image again and select it |
 |
||
|
7. Click on the Reflection Tab Check the Reflection Map box And again select your original image Click OK |
 |
||
|
8. Right click on your globe and choose shadow Right click on the color box and choose color on screen Select a color u think will look good from your background image Use the all round shadow with these settings Transparency 60 (or to suit yourself) Shadow size 104 Soft edge 15 Click OK |
|||
|
9. Position this globe where you would like it.... off to one side seems to work better than in the middle 10. Duplicate your globe3 times Make sure that your top Globe is still selected |
|||
|
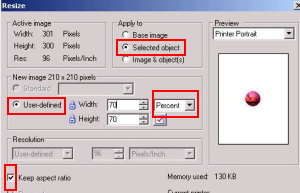
11. Go to Adjust/Resize In the Apply To box select Selected Object Make sure Keep Aspect Ratio is checked In the New Image Size area click on User Defined Change the type option to Percent Type 70 in the Width box Click OK. Move this smaller globe away from the larger globes. |
 |
||
|
12. Click on the next large globe to activate it Repeat Step 11 but changing the percentage to 50 13. Repeat Step 11 again changing the percentage this time to 30. 14. Arrange your globes to suit yourself You can also use the Arrange command to place the globes behind or between other globes. Also Experiment with the transparency of the globes. |
|||
|
15. Reopen your original image and duplicate it. Close the original. |
|||
|
16. Open your Easy Palette/Photo Effects/Blur Right click on Zoom Blur 2 and select Modify Properties and Apply Use these settings. Type: Zoom Out Quality: 100 Unblurred Radius: 0 Inward Blur: 50 Surrounding Blur: 80 Twisted Weight: 0 Click OK |
 |
||
|
17. Copy (ctrl+c) and paste(ctrl+v) into the globe canvas. Remember to reactivate the globe image canvas before pasting. 18. Right Click/ Properties and use a Merge Mode that you like and looks good with your image ... again you could play with transparency as well. 19. Go to Photo/Sharpen/Emphasise Edges and again try the different degrees of Sharpening 20. Activate one of the globes... Right click/ select All Objects Right Click/Merge All. |
|||
|
That's it!!
|
|||
|
For Variation you could also use
Particle Effects of your own choosing
|
|||
|
paho©2007
|
|||
|
|
|||
|
(Tutorials)
|
||||