 |
||
|
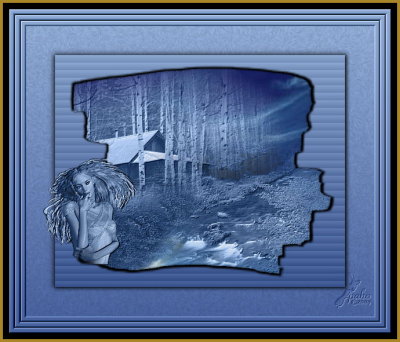
Blue Evening
|
||
|
For this tutorial I am going to take you from Go to Whoa in making your own Blend or if you wish you may use my images. This is my own Tutorial and any similarity to any other tutorial is coincidental. |
|
Version: PI 10 but can be done in other Versions Level: Advanced Beginner |
|
Materials Needed: Image or Images of your choice. I used 3 images. One of the sky, one of a cottage and one of a stream. FMTile Tools Blend Emboss (FMTile Tools is a Demo but Blend Emboss will keep working.) Eye Candy BorderMania FiltersUnlimited2 Blending Mask Tutorial by Wouter here My Images Here Tip!!! If you don't have the Filters I have used try others that you may have. |
Tube  |
|
My Abbreviations of PhotoImpact commands are thus: R/c = Right click (or other click whichever you use) Commands separated with a forward slash (/) = the order of the commands or the options within a command |
|
Tools Used: Eraser Clone Brush Hue and Saturation/Colorize Photo Frame |
|
Let's Prepare our Background Blend. Don't forget to Save Often |
|
1. Open a new image 600 x 500. I always start out bigger than I need and then crop/resize if I need to. 2. R/C All 3. Open the Sky.jpg and R/C Copy 4. Go back to the new canvas and go to Edit/ Paste/ Fit into Selection. I will be calling this the Sky Image from now on :) |
|
|
|
5. Open Cottage.jpg 6. In the Easy Pallet find your Blending Mask and double click on it to apply to Cottage.jpg 7. Click on the Transform tool and in the Attributes Bar click on Selection. Unlock Keep Aspect Ratio. Drag the Nodes on each side of the selection to the edge of the image. You have now resized your mask. 8. R/C Convert to Object. |
||
|
TIP!!!!
You can now save this as a .UFO for future use by dragging it to its own
canvas.
|
||
|
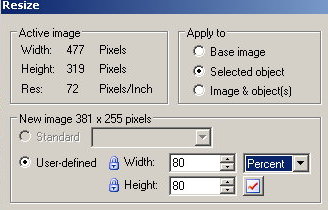
9. R/C Copy 10. Back to the Sky Canvas. R/C Paste. 11. Adjust/ Resize. In the Dialogue box in Apply To check Selected Object and enter 80 percent. Select Percent from the Drop Down Box in the New Image Section. Move the Cottage image OFF to the left a little. 12. R/C Align/ Center Vertically
|
 |
|
|
13. Open Stream.jpg 14. Easy Pallet/ Galleries/ Fill Gallery/ Fade Out/ 008 15. Double Click to Apply 16. R/C Convert to Object. 17. R/C Copy 18. Back to Sky Image again and R/C Paste |
|
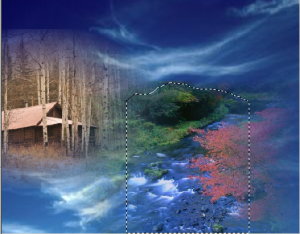
19. Adjust/ Resize 80% 20. R/C Align/ Bottom 21. R/C Align Right 22. Select the eraser tool from the Tool Bar with these settings: Size 86 Transparency 80 Soft Edge 50. Click along the top of the Stream image to get rid of the top line. Activate the Cottage and do the same there. |
 |
|
Tip!!!!
Using the High Transparency and large Size eraser gives a neater softer
edge.
|
|
|
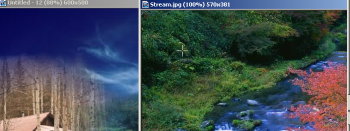
23. Open the original Cottage.jpg. From the Tool Bar Select Clone-Paintbrush. Size 33 other settings at default. Click on the Mode Button in the Attribute Bar. 24. On Cottage.jpg hold the Shift Key and Left Click in the middle of the Greenery 25. Click on the top bar of the Sky Image to activate it then click (Don't drag) along the left side of the Stream till you are happy with the results. 26. Click out of Mode and you will see that the greenery is an object. I added a little transparency to my Greenery. 17 |
 |
|
That's the Background put together. Now let's make it
all one color
|
|
Step 2.
|
|
1. Activate the Cottage. 2. Adjust Hue and Saturation. In the Dialogue box check Colorize. I used these Settings: Hue 36/ Saturation -35/ Lightness 10. |
Tip!!! You can of course go your own way here with which color you prefer. Just play with the Settings. I went with the Blue to match the sky. And also please note that depending on the images that are used, the same settings might not work on all 3 images. Just try to match them as you see fit. | |
|
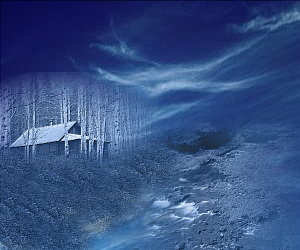
3. Activate the stream and do the above steps again 4. Activate the cloned greenery and repeat the above. Now your entire image should be blue. 5. With one of the objects selected R/C Merge all. 6. Effects FMTile Tools/ Blend Emboss. Default Settings or you can change the Intensity. I used 0.359 |
 |
|
| Step 3. | |
|
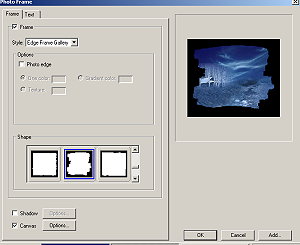
1. Ctrl+D to duplicate. (Just in case!!) 2. Menu Bar/ Photo/ PhotoFrame/ Edge Frame gallery. 3. Frame Checked. Photo Edge Unchecked. Canvas Checked. Click on the color box and choose Black as canvas color. OK |
 |
|
4. Tool Bar/ Magic Wand Tool. Select by Line. Similarity 32. Search Connected Pixels Checked. Select the black BG. 5. R/C Invert. 6. R/C Convert to Object 7. Tool Bar/ Pick Tool / Soft Edge 5 8. Drag to Sky Image 9. R/C Shadow/ All Round Shadow (5th) Settings: Transparency 0. Shadow Size 102. Soft Edge 0. Color Black. 10. Save as .ufo if you want to |
|
Step 4
|
|
1. Open a new image 600 x 500 2. Edit/ Fill Gradient. Choose 2 shades of blue from the image you have just done. OK 3. Effects/ EyeCandy/ Swirl you can play with the settings here. OK 4. Standard Selection Tool. Rectangle. Fixed sized 500 x 400. Click in the top left corner of your canvas and there is your selection. |
|
5. R/C Convert to Object. R/C Align/ Center Both 6. Edit/ Fill/ Use your Gradient 7. Effects/ FiltersUnlimited/ Special Effects 1/ Venetian Blinds/ Horizontal, Settings: 231/ 13 8. R/C Shadow. All Round Shadow. Settings: 10/ 101/ 10. Color Black |
|
9. Back to Sky Image 10. R/C Copy. Back to the new canvas and R/C Paste 11. Adjust/ Resize/ Selected Object/ 75 Percent 12. R/C Align/ Center Both |
|
13. Open your Tube R/C Copy R/C Paste into your image. Resize if necessary. 14. R/C Shadow. All Round Shadow. 20/ 102/ 0 15. R/C Merge All |
|
16. Adjust/ Expand Canvas/ 10/ Color White 17. Magic Wand Tool/ Select White area. 18. Edit Fill/ Gradient/ Same Gradient as before 19. Effects/ Border Mania/ Frame#2 Accept Defaults. 20. Hit Enter to Deselect 21. Repeat Steps 16-20 twice more. |
|
22. Add any text you would like 23. Add your Watermark 24. Save as a jpg. |
|
I hope you enjoyed this tutorial and that you have learned
some more of the tools available in PI. Any questions please don't hesitate
to contact me through email at the bottom of this page. Also please sign
my guestbook. It would be nice to know where you are from and what you
think of this tutorial and my other tuts as well. Check out my PI
Hints and Tips too. Some of them are real handy.
|
|
paho 2009
|
|
(Tutorials)
|
||||